Eggplant DAIランナーの使用
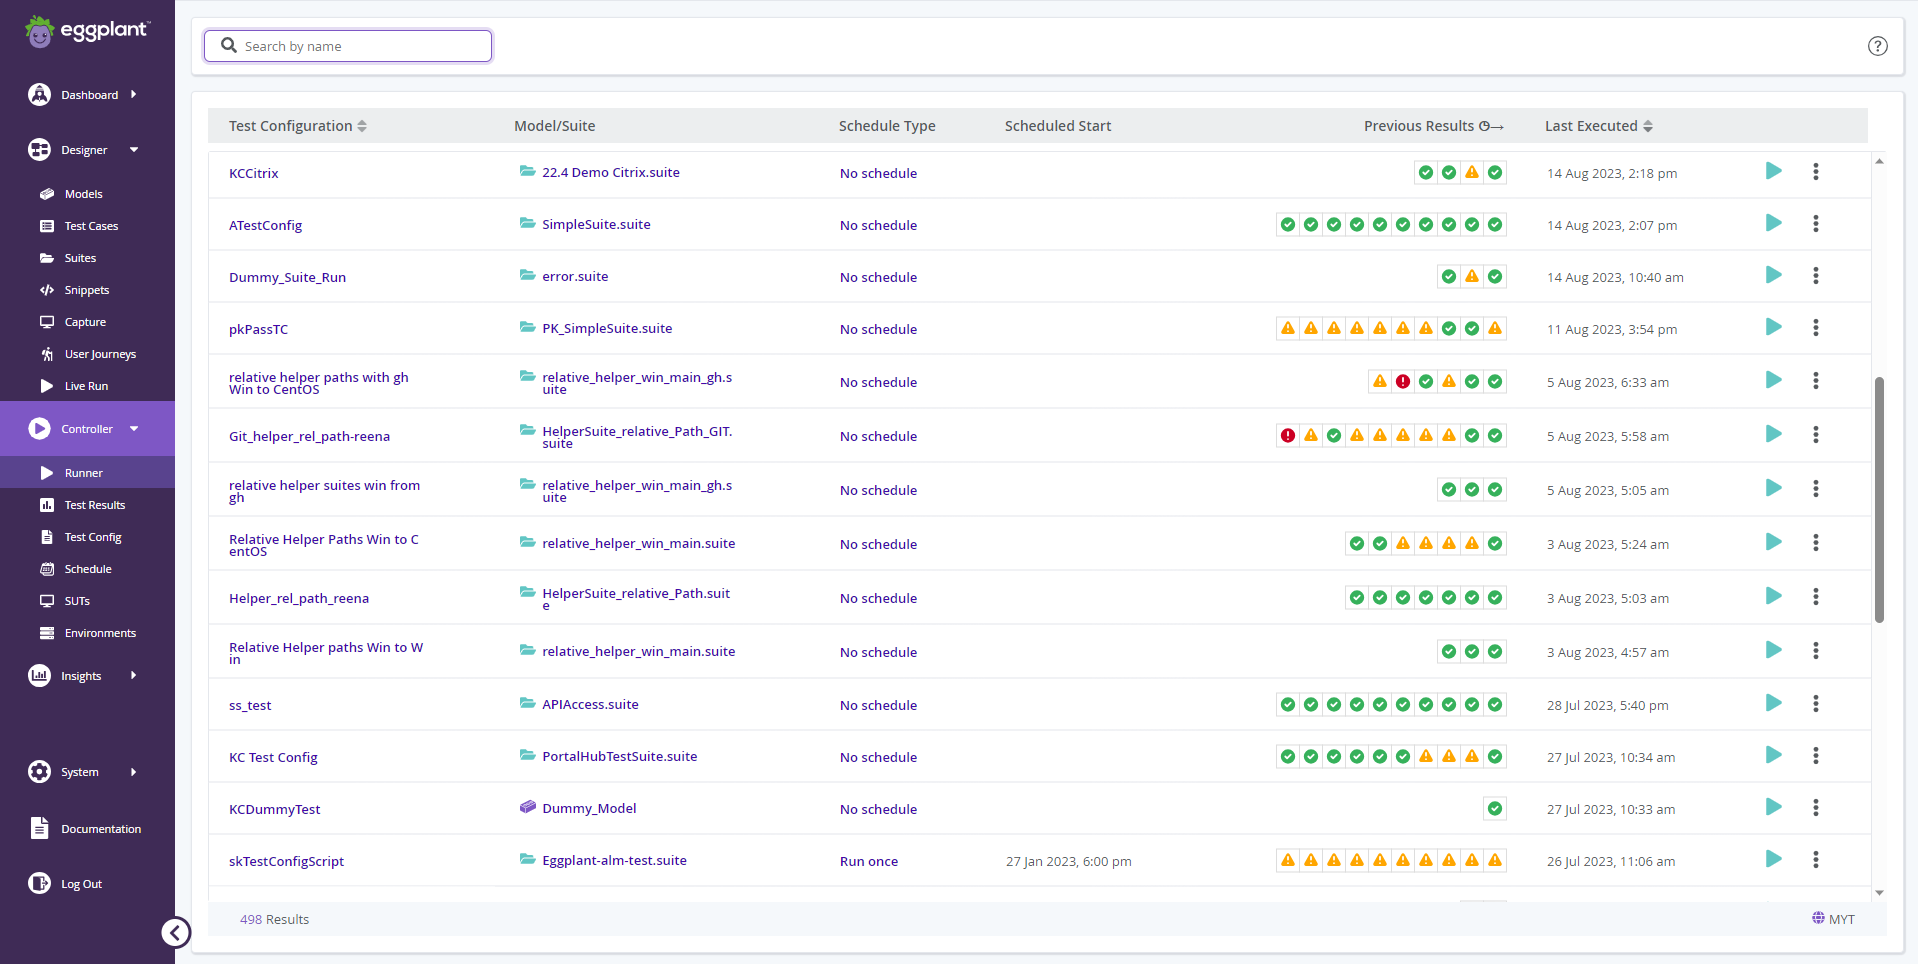
Eggplant DAI Runnerでは、Test Configsタブで作成された事前設定されたテストを実行し、カラーコード付きのドットを通じてそれらのテストの結果を表示できます。また、Runnerタブからテストの実行をスケジュールすることもでき、進行中のテストを確認できます。Runnerタブにアクセスするには、Eggplant DAIインターフェースの左側のメニューでControllerをクリックします。

テストの実行
テスト実行を行うには、Runnerタブから実行したいTest Configsに対して Runボタンをクリックします。複数のテストを実行する場合は、この手順を繰り返します。
Eggplant FunctionalまたはEggplant DAIスニペットエディターで手動で変更したスクリプトをテスト実行前に実行環境(Manage Agents > Manage Suites)に再アップロードすることを忘れないでください。そうしないと、変更が上書きされる可能性があります。
親モデルを通じて実行された場合、サブモデルは親モデルと同じSuiteを使用します。
進行中のTest Configsインスタンスを停止するには、をクリックします。
Test Configsスケジュールの一部であるテスト実行を中止すると、その構成スケジュールに属する_すべて_の実行が中止されます。
同じテスト構成の別のテスト実行が進行中の場合、スケジュールされた時間に実行されるか、 Runボタンをクリックして実行される場合、新しく開始されたテスト実行はすぐにエラーで完了します。
Runnerインターフェースでは、テスト構成に関する以下の情報が表示されます:
-
Test Configs: テスト構成の名前。この列はアルファベット順に並べ替えることができます。
-
Model/Suite: 選択されたTest Configsに使用されたEggplant DAIモデルまたはSuiteへのリンク。それぞれ左側にあるアイコン、ビルディングブロック
がモデルを、フォルダ
がSuiteを表します。
-
Schedule Type: テスト構成のスケジュールのタイプ。指定されたテスト構成にスケジュールが存在しない場合、No Scheduleと表示されます。スケジュールタイプの一覧については、以下のScheduling Options を参照してください。
-
Scheduled Start: 与えられた構成のスケジュールされたテスト実行が開始される日時。そのTest Configsにスケジュールが存在しない場合、このフィールドは空白です。
-
Previous Results: カラーコード付きのドット(下記参照)を通じて、最新10回のテスト実行(該当する場合)の結果を表示します。個々のドットにカーソルを合わせると、実行のステータスと日時が表示されます。クリックして、その実行の結果のスナップショットを表示します。
テストが成功したことを示します。
テストが失敗したことを示します。
Test Configsが進行中であることを示します。
テストがエラーで結果となったことを示します。
テスト実行が中止されたことを示します。
詳細については、実行結果の表示を参照してください。
- Last Executed: 最も最近の実行の日時。テスト実行が進行中の場合はIn Progressと表示されます。この列は年代順に並べ替えることができます。
実行結果の表示
詳細なテスト実行結果のアクセス
「Previous Results」列では、個々の実行結果アイコンをクリックすることで、Test Configsの実行に関する洞察を得ることができます。これらのアイコンは、
合格、
失敗、
進行中、
エラー、または
中止
などのさまざまな結果を表しています。これらをクリックすると、テスト実行の詳細な要約が展開されます。
テスト実行の概要表示
この要約では、以下の情報が見つかります:
- Execution result: テストが成功したか問題に遭遇したかを示します。
- Run details: 実行が開始された時刻、その期間、System Under Test (SUT)に関する情報などの詳細。
- Steps completed: 正常に実行されたステップの数。
- Total reruns completed: すべてのステップで実行された再実行の合計回数。
- Total test runs completed: 初期実行と必要な再実行を含む全体的なテスト実行の数。
Donut chart
Donut chart は、Test Configsの結果を視覚的に表現します。このチャートには次の情報が表示されます:
- Passed first time: 最初の試行で合格したテストケースの数。
- Passed after rerun: 初期に失敗したが、再実行後に最終的に合格したテストケース。
- Failed: 成功基準を満たさなかったテストケース。
- Errored: 実行中にエラーに遭遇したテストケース。
- Cancelled: 完了しなかったテストケース。
- In progress: 現在実行中のテストケース。
複数回の再実行が行われるケースでは、ドーナツチャートは再実行の最終結果のみを表示します。再実行機能について詳しくは、次のページを参照してください: Test Configuration
Test Configs Logs
テストプロセスと詳細なテストケース実行結果についてより深く理解するために、Test Configs Logsを参照できます。これらのログには、テストと関連する詳細が記録されています。

選択したテスト実行の結果をさらに詳細に調べるためにOpen in resultsをクリックします。これによりResultsタブが開き、選択したテスト実行のすべての個別のテスト実行が表示されますが、画面上部のView all resultsリンクをクリックすることでデフォルトのAll Runsビューに切り替えることができます。Open in resultsボタンは、Errorstateになった実行を除いてすべてのテスト結果に利用可能です。
エラー実行ドットをクリックすると、拡大表示されたビューでエラーの理由が表示されます:

Runnerからテスト実行の削除
Previous Results列で、 成功、
失敗、
進行中、
エラー、
中止を表す個々のカラーコード付きドットをクリックして、そのテスト実行の概要を拡大表示で確認します。
拡大表示でOpen in Resultsをクリックすると、選択したテスト実行の結果をさらに詳細に調べることができます。これによりTest Resultsタブが開き、選択したテスト実行のすべての個別のテスト実行が表示されます。
画面の右上隅にはDelete Runとラベル付けられた赤いボタンがあります。これをクリックすると確認ボックスが表示されます。削除を進めるにはConfirmをクリックします。
選択したテスト実行のインスタンスおよびその結果のすべてが削除されます。
削除が完了すると、画面はRunnerタブに戻ります。
テスト実行のスケジュール設定
スケジューリングは、特定の間隔でテストを実行し、必要な頻度で実行することができるため、テストランに大きな柔軟性をもたらします。
同じテスト構成に対する別のテスト実行が進行中の場合、新しく開始されたテスト実行は即座にエラーで完了します。これは、スケジュールされた時間に実行されるか、または Run ボタンをクリックして実行される場合にも適用されます。

スケジュールオプション
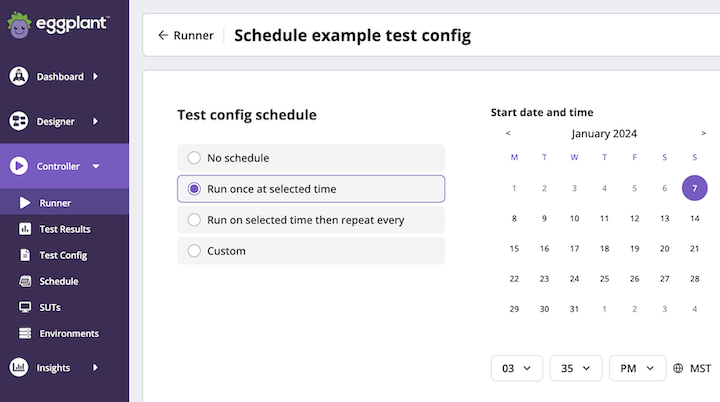
上記のTest Configsscheduleページを使用して、テスト構成の実行のスケジュールを設定します。Test Configsscheduleページを表示する方法は、次の2つの方法のいずれかを使用できます。
- Designerページ(Controller > Runner)を表示し、スケジュールを設定したいテスト構成を見つけ、指定されたスケジュールタイプをクリックします(デフォルトのスケジュールタイプはNo scheduleです)。
- Designerページを表示し、スケジュールを設定したいテスト構成を見つけ、そのActionメニュー(
...)をクリックし、Editを選択します。
DAI provides the following schedule types:
| schedule type | 説明 |
|---|---|
| No Schedule (default) | このテスト構成では実行がスケジュールされていません。このオプションのTest config schedule ページにカレンダーの日付または時刻セレクターは表示されません。 |
| Run once at selected time | 選択した日時にテストを 1 回実行します。このオプションを選択すると、上に示したカレンダーの��日付と時刻の選択ツールが表示されます。 |
| Run on selected then repeat every | 選択した日付、時刻、頻度でテストを実行します。このオプションでは、カレンダーと時刻のセレクター、および [繰り返し間隔] フィールドが表示されます。ドロップダウン リストでは、Days (既定)、Minutes、Hours、または Weeks を選択できます。このオプションを選択すると、選択した日付と時刻に初めてテストが実行され、その後は指定した頻度で繰り返し実行されます。 |
| Custom | 指定された日時にテストを実行し、以下に示す Custom time interval フィールドで Cron 構文を使用するオプションを提供します。このオプションを選択すると、選択した日時に初めてテストが実行され、その後は指定した Cron 構文スケジュールに従って繰り返し実行されます。DAI Cron 構文では、以下の カスタム Cron スケジュールの例 に示すように、日曜日ではなく月曜日が週の最初の曜日として認識されます。 |
Custom Cron Schedule Examples
# schedule executing at midnight from Monday to Friday \{#schedule-executing-at-midnight-from-monday-to-friday}
0 0 * * 0-4

# schedule executing every weekday at 5:30PM \{#schedule-executing-every-weekday-at-530pm}
:::注意点
Cron構文の使用方法についての情報については、Custom time intervalフィールドの横にあるヘルプ(?)ボタンをクリックしてください。また、この記事も参照できます。
Cron 構文の使用に慣れていないが、さらに詳しく知りたい場合は、カスタマー サポート までお問い合わせください。
:::
ステップバイステップ:テストのスケジュール設定
-
以下の2つの方法のいずれかを使用して、Test config scheduleページを表示します:
- Runnerページ(Controller > Runner)に移動し、スケジュールを設定したいテスト構成を見つけ、指定されたスケジュールタイプをクリックします。
- Runnerページに移動し、スケジュールを設定したいテスト構成を見つけ、そのテスト構成のActionメニュー(
...)をクリックし、Editを選択します。
-
希望するスケジュールオプションのラジオボタンを選択してください:
- Run once at selected time
- Run on selected time and repeat every
- Custom
Test Configsscheduleページには、選択したスケジュールオプションとStart date and timeのカレンダー日付と時間のセレクタが表示されます。
- Run on selected and the repeat everyを選択した場合、スケジュールオプション の上に表示されているRepeat everyフィールドと間隔セレクタも表示されます。
- Customを選択した場合、スケジュールオプション で上に表示されているように、Custom time intervalフィールドも表示されます。ここには、Cron構文を入力することができます。
-
テスト構成を実行する日時、または最初に実行する日時を選択し、適切な場合は時間間隔またはCron構文を指定してください。
-
スケジュールを保存するにはSaveをクリックし、破棄する場合はCancelをクリックしてください。
すべての実行を表示する
Test Configs内のすべての実行を表示できます。これには、実行されなかった実行、進行中の実行、通常の合格または失敗ステータスの実行が含まれます。Test Configs内のすべての実行を表示することは、失敗した実行の原因を特定するための詳細を見つけるのに特に役立ちます。
実行履歴を表示する
Actionメニュー から、履歴を表示したいTest ConfigsのView Allを選択します。最新の実行を表示する別のインターフェースが開きます:
- Execution Date: Test Configsの日時。
- Status: カラーコード付きカプセル形式でテスト実行のステータスを表示します。オプションは以下の通りです:
- Success
- Failed
- In Progress
- Error
- Canceled
- Open in Results: Open in Resultsをクリックして、選択したテスト実行の結果をさらに詳細に調べます。これによりResultsタブが開きますが、View all resultsをクリックすることでデフォルトのAll Test Runsビューに切り替えることができます。
- Expand row button: 選択した実行の結果のスナップショットを表示するためにクリックします。
RunnerナビゲーションリンクをクリックしてRunnerタブに戻ります。
実行履歴からテスト実行を削除する
Open in Resultsをクリックして、選択したテスト実行の結果をさらに詳細に調べます。これによりResultsタブが開き、選択したテスト実行のすべての個別のテスト実行が表示されます。
画面の右上隅にはDelete Runとラベル付けられた赤いボタンがあります。これをクリックすると確認ボックスが表示されます。削除を進めるにはConfirmをクリックします。
選択したテスト実行のインスタンスおよびその結果のすべてが削除されます。
削除が完了すると、画面はRun Historyタブに戻ります。
SUT および実行環境への接続の再試行制限と間隔を設定する
次の環境変数を使用して、SUT または実行環境への失敗したテスト接続を自動的に再試行するように DAI ランナーを構成できます。
-
RETRY_SLEEP_INTERVAL_SECONDS -
RETRY_TIMEOUT_SECONDS
DAI サーバー構成ファイルには、デフォルトでこれらの変数が含まれています。これらの変数の説明と、DAI サーバー構成ファイルの変更手順については、Retries the connection for SUT and Execution Environmentsを参照してください。